Reproduction of an Original Edith Head Design
Rebekah Jackson, rekahbekah@gmail.com,
BYU ID: jrebeka
Mary Farahnakian, College of
Fine Arts and Communication
Project
Purpose
I will recreate
an original costume designed by the renowned Edith Head and present it at the
Costume Society of America national symposium.
Project
Importance
Edith
Head designed costumes for Hollywood productions over a career of 58 years
(Sauro 191). Though she started in costume design with little training or
experience, she quickly rose to the top of her field (“Edith Head” 192). She continued to garner great acclaim for her
work, and went on to win an unprecedented eight Academy Awards and an
additional 35 nominations. She was known for ability to work with difficult
actors and figures, and even became a great influence on teenage fashion for
her work in A Place in the Sun (Sauro
191,192). These great achievements and the influence she had on her field brought
her to my attention, and has inspired me to investigate the field of costume
design. I have long admired her work from repeated exposure to her designs and
have long desired to reproduce her work in an attempt to understand the workings
behind her designs. Reconstruction of her work through this project provides
such an opportunity, but more importantly will resurface acknowledgment of her
work at a national level. It will provide an opportunity for others to
re-examine her work and bring to new light her contributions to costume design.
Project
Profile Body
In this
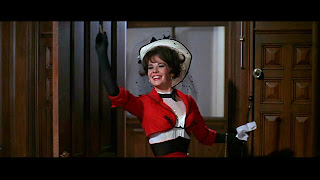
project I intend to reproduce an original Edith Head design from the 1965
production The Great Race. I chose
this particular costume because it is an example of Head’s capabilities, its origin
from the well-known classic directed by Edward Blake, and because of the
similarities in height and figure between myself and the actress, Natalie Wood.
When I finish
my research on Edith Head and her career for a complete understanding of her
work, I will study the original costume to establish a basis for the
reproduction. After sketching an authentic view of the garment, I will find a pattern
similar to the design in order to estimate the necessary supplies needed to
recreate the gown, and provide a starting point for my own design. When the
design is complete, I will purchase materials similar to the ones used on the
original garment and use these materials to reconstruct the gown with my own
sewing machine and appliances. I will also attempt to replicate the
coordinating accessories for a complete ensemble. All alterations necessary to
fit it to my own person will be completed as well, during which time I will
refer to the strategies provided in Edith Head’s The Dress Doctor for a proper fit. Upon completion, the garment should fit me exactly and maintain
the integrity of the original design.
Anticipated
Academic Outcome
With the
design completed, I will travel to the 2014 national symposium of the Costume
Society of America. There the dress will be placed in an exhibit where I will
formally present the garment and my research. Following the symposium I will
also have a complete paper that goes into the depth of my research on Edith
Head and the recreation of her work and submit it for academic publishing.
From
this project I also hope to improve my working knowledge of costume design,
clothing construction, and perfect my understanding of Edith Head’s
contributions to the field. From using Head’s strategies for working with
different figures, I will also learn how to create effective designs that
enhance different body types.
Qualifications
I have
years of experience in sewing and design. Throughout high school I was hired
out as an independent sewing contractor, sewing hundreds of items including
everything from doll clothes to replicas of an oriental blouse. In 2010, I
entered the Family Career and Community Leaders of America (FCCLA) Star Events
competition and won gold at the state level for clothing construction. In 2012
I placed in the top five of my category in the national Simplicity & Joann Fabric 2011
Halloween Costume
Contest.
Mary Farahnakian, is particularly well suited
to mentor me as she currently teaches classes on historical costume design. She
is a Professor of Design and Technology in the Theatre and Media Arts
department. She is a member of the national board of directors of the Costume
Society of America and a member of the International Textile and Apparel
Association. She received her PhD at Brigham Young University and has designed
with Mary McFadden in New York and Jean Barthet and
Eric Dubrulle in Paris.
Project
Timetable
In January I will finish research necessary for construction of the dress and make preliminary sketches of the design. In February, I will begin searching for and purchasing supplies. By April I will have the notions needed for construction of the garment, have completed my research, and signed up for the Costume Society of America’s 2014 symposium. In May I will proceed to constructing the garment and complete it by August 31st, 2013. The deadline for the entering the symposium is in October.
Scholarly
Sources
"Edith
Head." Encyclopedia of World Biography. 2nd ed. Vol. 18. Detroit:
Gale, 2004. 191-193. Gale
Virtual Reference Library. Web. 1
Nov. 2012.
Head,
Edith, and Jane Kesner. Ardmore. The Dress Doctor. Boston: Little,
Brown, 1959. Print.
Head,
Edith, and Paddy Calistro. Edith Head's Hollywood. New York: Dutton,
1983. Print.
Sauro, Clare. "Head,
Edith." Encyclopedia of Clothing and Fashion. Ed. Valerie Steele.
Vol. 2. Detroit:
Charles Scribner's Sons, 2005. 191-192. Gale Virtual Reference
Library. Web. 30 Oct. 2012.
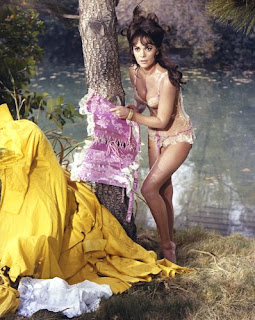
So that's very interesting and everything, but here comes the fun stuff. After being awarded the grant (I was rather shocked when I got it, I didn't expect to,) I immediately started on the undergarments. I know I don't mention undergarments in the proposal but I need them to make the costume look right. The first undergarment, or the corset, was very interesting to make. I drafted the pattern myself (I've never done that before) while basing it off of corsets Natalie Wood used in The Great Race (1965) and a real corset from 1908.
Sorry, these pictures are all a bit scandalous but they're the best I have of the corset!
So next step: Do mock-up and order supplies. Lets just say I realized what I had got myself into when I started sewing those curvy seams together - a lot of stay-stitching and clipping to get those "mountains" and "valleys" together. Luckily I didn't have to do much altering, though, as all I had to do was take out a pattern piece which shrunk the whole thing about four inches. (I guess the mannequin I used for draping the pattern was a little too big.) (:
So, for the supplies I bought steel boning, 24 grommets, bone casing, and coutil (a very expensive but strong fabric for making corsets). I was disappointed, however, when I could only get white or a few other colors of coutil. I wanted it to be pink, similar to the movie (even though you don't see what corset she wears under the costume I wanted it similar to the one she wears in a later scene.) So... I dyed it! That was really exciting and terrifying. I never could have done it without my mentor, Professor Farahnakian, who helped me every step of the way.
You can kind of see the seams in this picture as I trim them and fold them. I pressed the allowances all in one direction except for the side back seam which had a gusset (you can see the gusset in the picture) where I pressed the seam open and then turned in the raw edges. After that I added the waist stay, boning channels, bones, busk, bias tape and grommets with a lot of measuring, marking, pinning and slow sewing.


No comments:
Post a Comment